Aller au contenu

WPF

Windows Presentation Foundation (WPF) est une solution d'interface utilisateur (UI) Windows qui fait partie de .NET. Développé à l'origine en 2006, il était destiné à succéder à WinForms. Pour plus d'informations, consultez sa documentation officielle.

WPF permet de créer une interface utilisateur riche et sophistiquée. Il sépare le code de l'interface utilisateur en utilisant XAML, un langage basé sur XML développé par Microsoft. cTrader Windows est une application WPF et tous les éléments d'interface utilisateur que vous voyez sont alimentés par cette solution.

L'utilisation de WPF permet de développer une interface utilisateur riche en fonctionnalités et quasi parfaite au pixel près. Cependant, WPF a une courbe d'apprentissage abrupte. Si vous souhaitez créer des éléments d'interface utilisateur relativement simples, vous pouvez utiliser les contrôles de graphique ou WinForms.

Remarque

Les algos utilisant WinForms ou WPF ne peuvent être exécutés que sur des machines Windows.

Pour utiliser WPF avec les cBots et les indicateurs, changez votre compilateur cTrader du compilateur intégré au compilateur SDK .NET.

Configurer votre projet

De la même manière que pour WinForms, avant de pouvoir utiliser WPF avec vos cBots et indicateurs, vous devrez apporter quelques modifications au fichier de projet de votre indicateur ou cBot. Comme WPF ne fonctionne que sous Windows, vous devrez changer le framework cible de votre projet d'indicateur ou de cBot pour la variante Windows de .NET.

Pour ce faire, ouvrez votre fichier de projet dans Visual Studio et remplacez son contenu par ce qui suit :

 1
 2
 3
 4
 5
 6
 7
 8
 9
10
<Project Sdk="Microsoft.NET.Sdk">
  <PropertyGroup>
    <TargetFramework>net6.0-windows</TargetFramework>
    <UseWpf>true</UseWpf>
  </PropertyGroup>

  <ItemGroup>
    <PackageReference Include="cTrader.Automate" Version="1.*" />
  </ItemGroup>
</Project>

Nous avons ajouté la balise UseWpf et modifié la valeur de TargetFramework en net6.0-windows.

Ensuite, changez la valeur du paramètre de classe AccessRights en FullAccess. À moins que cette modification ne soit effectuée, votre extension n'aura pas les droits d'accès suffisants pour fonctionner avec WPF.

Reconstruisez votre projet après avoir effectué les modifications ci-dessus.

Créer et afficher une fenêtre à l'aide de WPF

Le processus de création d'une fenêtre personnalisée est similaire à la création d'un WinForm personnalisé.

Après avoir configuré votre projet, faites un clic droit dessus, sélectionnez Ajouter puis choisissez Fenêtre (WPF)....
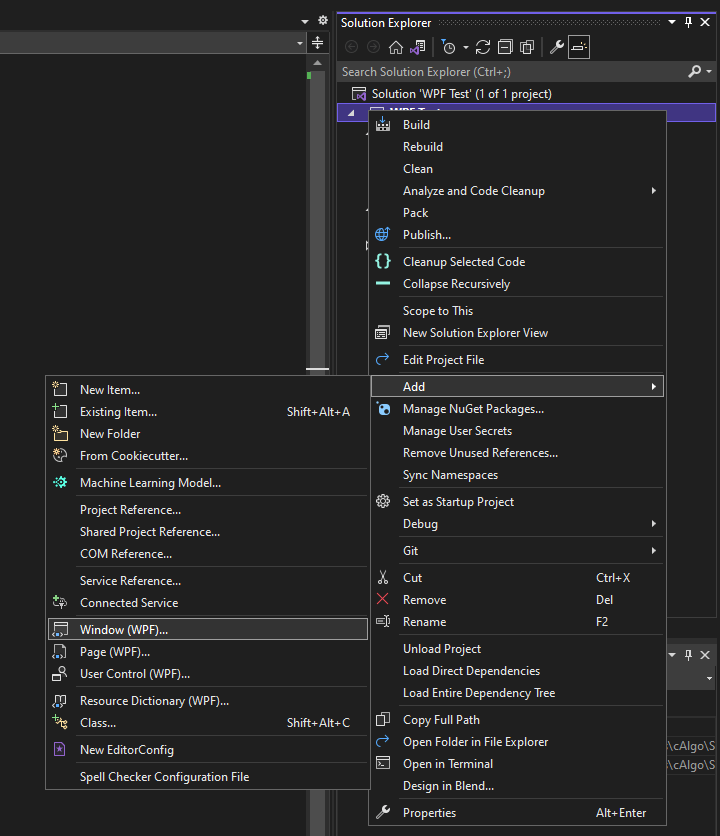
Image title

Dans la fenêtre nouvellement ouverte, sélectionnez l'option Fenêtre WPF. Définissez le nom de la fenêtre sur MainWindow et cliquez sur le bouton Ajouter. La nouvelle fenêtre WPF apparaîtra dans l'explorateur de solutions de votre projet. Elle comportera deux fichiers, un fichier .XAML et un fichier .cs contenant le code backend.

Ouvrez le fichier .XAML et copiez-collez le code suivant pour changer sa couleur d'arrière-plan en "SlateGray".

 1
 2
 3
 4
 5
 6
 7
 8
 9
10
<Window x:Class="WPF_Test.MainWindow"
        xmlns="http://schemas.microsoft.com/winfx/2006/xaml/presentation"
        xmlns:x="http://schemas.microsoft.com/winfx/2006/xaml"
        xmlns:d="http://schemas.microsoft.com/expression/blend/2008"
        xmlns:mc="http://schemas.openxmlformats.org/markup-compatibility/2006"
        xmlns:local="clr-namespace:WPF_Test"
        mc:Ignorable="d"
        Title="MainWindow" Height="450" Width="800" Background="SlateGray">
    <Grid />
</Window>

Collez le code suivant dans le fichier source principal de votre indicateur :

 1
 2
 3
 4
 5
 6
 7
 8
 9
10
11
12
13
14
15
16
17
18
19
20
21
22
23
24
25
26
27
28
using cAlgo.API;
using System.Threading;
using WPF_Test;

namespace WPFTest
{
    [Indicator(IsOverlay = true, AccessRights = AccessRights.FullAccess)]
    public class WPFTest : Indicator
    {
        protected override void Initialize()
        {
            var thread = new Thread(() =>
            {
                var window = new MainWindow();

                _ = window.ShowDialog();
            });

            thread.SetApartmentState(ApartmentState.STA);

            thread.Start();
        }

        public override void Calculate(int index)
        {
        }
    }
}

Lorsque vous ajoutez une nouvelle fenêtre WPF, elle utilisera l'espace de noms de votre indicateur ou cBot (tel que cAlgo). Dans le fichier .cs contenant le code backend de la fenêtre, changez-le en WPF_Test et assurez-vous qu'il correspond à votre instruction using dans le code de l'indicateur.

Reconstruisez l'indicateur soit depuis Visual Studio, soit en utilisant cTrader Algo.

Une fois le processus de construction terminé, créez une instance d'indicateur. Vous devriez voir votre fenêtre personnalisée apparaître presque immédiatement au lancement.
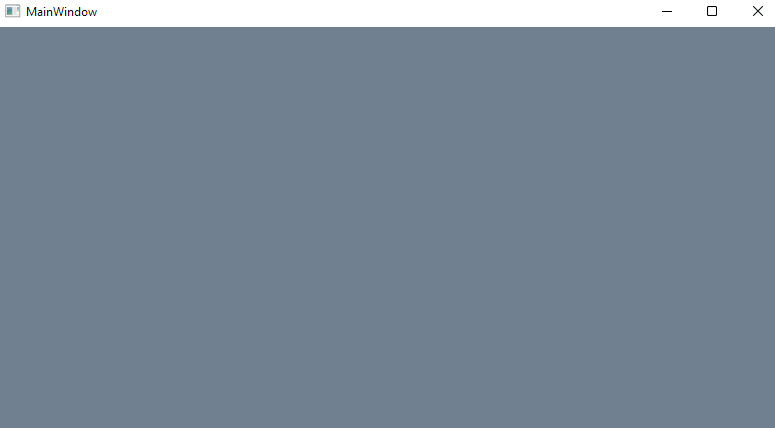
Image title

Afficher un panneau de trading

Dans cet exemple, nous allons créer un simple panneau de trading en utilisant WPF. Créez un nouveau cBot et définissez son nom sur WPF Trading Panel.

Ouvrez votre nouveau robot dans Visual Studio et ajoutez une nouvelle ressource WPF comme indiqué ci-dessus. Définissez le nom de la fenêtre sur MainWindow.
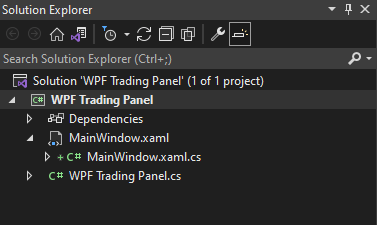
Image title

Ensuite, ouvrez le fichier .XAML de la fenêtre et collez-y le code suivant :

 1
 2
 3
 4
 5
 6
 7
 8
 9
10
11
12
13
14
15
16
17
18
19
20
21
22
23
24
25
26
27
28
29
30
31
32
33
34
35
36
<Window x:Class="WPF_Trading_Panel.MainWindow"
        xmlns="http://schemas.microsoft.com/winfx/2006/xaml/presentation"
        xmlns:x="http://schemas.microsoft.com/winfx/2006/xaml"
        xmlns:d="http://schemas.microsoft.com/expression/blend/2008"
        xmlns:mc="http://schemas.openxmlformats.org/markup-compatibility/2006"
        xmlns:local="clr-namespace:WPF_Trading_Panel"
        mc:Ignorable="d"
        Title="WPF Trading Panel" Height="200" Width="500" Background="SlateGray" WindowStartupLocation="CenterScreen" ResizeMode="NoResize" Closed="Window_Closed" Loaded="Window_Loaded" DataContext="{Binding RelativeSource={RelativeSource Self}}">
    <Grid>
        <Grid.ColumnDefinitions>
            <ColumnDefinition Width="Auto"/>
            <ColumnDefinition Width="*"/>
        </Grid.ColumnDefinitions>

        <Grid.RowDefinitions>
            <RowDefinition Height="Auto" />
            <RowDefinition Height="Auto" />
            <RowDefinition Height="Auto" />
            <RowDefinition Height="*" />
        </Grid.RowDefinitions>

        <TextBlock Grid.Column="0" Grid.Row="0" Text="Symbol" Margin="5" />
        <ComboBox Grid.Column="1" Grid.Row="0" ItemsSource="{Binding Symbols, UpdateSourceTrigger=PropertyChanged}" SelectedValue="{Binding SelectedSymbol, Mode=TwoWay, UpdateSourceTrigger=PropertyChanged}" Margin="5" />

        <TextBlock Grid.Column="0" Grid.Row="1" Text="Direction" Margin="5" />
        <ComboBox Grid.Column="1" Grid.Row="1" ItemsSource="{Binding Directions, UpdateSourceTrigger=PropertyChanged}" SelectedValue="{Binding SelectedDirection, Mode=TwoWay, UpdateSourceTrigger=PropertyChanged}" Margin="5" />

        <TextBlock Grid.Column="0" Grid.Row="2" Text="Volume" Margin="5" />
        <TextBox Grid.Column="1" Grid.Row="2" Text="{Binding Volume, Mode=TwoWay, UpdateSourceTrigger=PropertyChanged}" Margin="5" />

        <StackPanel Orientation="Vertical" Grid.Column="0" Grid.ColumnSpan="2" Grid.Row="3" VerticalAlignment="Bottom">
            <Button x:Name="ExecuteButton" Content="Execute" Click="ExecuteButton_Click" Margin="5" />
            <Button x:Name="CloseAllButton" Content="Close All Symbol Positions" Click="CloseAllButton_Click"  Margin="5" />
        </StackPanel>
    </Grid>
</Window>

Par la suite, ouvrez le fichier backend .cs et collez le code suivant :

  1
  2
  3
  4
  5
  6
  7
  8
  9
 10
 11
 12
 13
 14
 15
 16
 17
 18
 19
 20
 21
 22
 23
 24
 25
 26
 27
 28
 29
 30
 31
 32
 33
 34
 35
 36
 37
 38
 39
 40
 41
 42
 43
 44
 45
 46
 47
 48
 49
 50
 51
 52
 53
 54
 55
 56
 57
 58
 59
 60
 61
 62
 63
 64
 65
 66
 67
 68
 69
 70
 71
 72
 73
 74
 75
 76
 77
 78
 79
 80
 81
 82
 83
 84
 85
 86
 87
 88
 89
 90
 91
 92
 93
 94
 95
 96
 97
 98
 99
100
101
102
103
104
105
106
107
108
109
110
111
112
113
114
115
116
117
118
119
120
121
122
123
124
125
126
127
128
129
130
131
132
133
134
135
136
using System;
using System.Collections.Generic;
using System.Windows;
using System.Collections.ObjectModel;
using cAlgo.API;
using System.ComponentModel;
using System.Runtime.CompilerServices;
using System.Linq;

namespace WPF_Trading_Panel
{
    public partial class MainWindow : Window, INotifyPropertyChanged
    {
        private readonly Robot _robot;
        private string _volume, _selectedSymbol, _selectedDirection;

        public MainWindow(Robot robot)
        {
            _robot = robot;

            InitializeComponent();
        }

        public event PropertyChangedEventHandler PropertyChanged;

        public ObservableCollection<string> Symbols { get; } = new ObservableCollection<string>();

        public ObservableCollection<string> Directions { get; } = new ObservableCollection<string>(new string[] { "Buy", "Sell" });

        public string SelectedSymbol
        {
            get => _selectedSymbol;
            set
            {
                if (SetValue(ref _selectedSymbol, value))
                {
                    ChangeVolume();
                }
            }
        }

        public string SelectedDirection
        {
            get => _selectedDirection;
            set => SetValue(ref _selectedDirection, value);
        }

        public string Volume
        {
            get => _volume;
            set => SetValue(ref _volume, value);
        }

        private void ExecuteButton_Click(object sender, RoutedEventArgs e)
        {
            _robot.BeginInvokeOnMainThread(() =>
            {
                var direction = "Buy".Equals(SelectedDirection, StringComparison.Ordinal) ? TradeType.Buy : TradeType.Sell;

                var volume = double.Parse(Volume);

                _ = _robot.ExecuteMarketOrder(direction, SelectedSymbol, volume);
            });
        }

        private void Window_Closed(object sender, EventArgs _) => _robot.BeginInvokeOnMainThread(_robot.Stop);

        private bool SetValue<T>(ref T storage, T value, [CallerMemberName] string propertyName = null)
        {
            if (Equals(storage, value))
            {
                return false;
            }

            storage = value;

            OnPropertyChanged(propertyName);

            return true;
        }

        private void Window_Loaded(object sender, RoutedEventArgs _)
        {
            PopulateSymbols();

            SelectedDirection = Directions[0];
        }

        private void OnPropertyChanged([CallerMemberName] string propertyName = null) => PropertyChanged?.Invoke(this, new PropertyChangedEventArgs(propertyName));

        private void CloseAllButton_Click(object sender, RoutedEventArgs e)
        {
            _robot.BeginInvokeOnMainThread(() =>
            {
                foreach (var position in _robot.Positions)
                {
                    if (position.SymbolName.Equals(SelectedSymbol, StringComparison.Ordinal) is false) continue;

                    _ = _robot.ClosePositionAsync(position);
                }
            });
        }

        private void PopulateSymbols()
        {
            _robot.BeginInvokeOnMainThread(() =>
            {
                var symbolsList = new List<string>();

                symbolsList.AddRange(_robot.Symbols);

                _ = Dispatcher.BeginInvoke(() =>
                {
                    foreach (var symbol in symbolsList)
                    {
                        Symbols.Add(symbol);
                    }

                    SelectedSymbol = Symbols.FirstOrDefault();
                });
            });
        }

        private void ChangeVolume()
        {
            if (string.IsNullOrWhiteSpace(SelectedSymbol)) return;

            _robot.BeginInvokeOnMainThread(() =>
            {
                var minVolume = _robot.Symbols.GetSymbol(SelectedSymbol).VolumeInUnitsMin;

                _ = Dispatcher.BeginInvoke(() => Volume = minVolume.ToString());
            });
        }
    }
}

Nous sommes maintenant prêts à lancer notre fenêtre personnalisée en utilisant notre cBot. Ouvrez le fichier source du cBot et insérez le code ci-dessous :

 1
 2
 3
 4
 5
 6
 7
 8
 9
10
11
12
13
14
15
16
17
18
19
20
21
22
23
24
using cAlgo.API;
using System.Threading;
using WPF_Trading_Panel;

namespace WPFTradingPanel
{
    [Robot(AccessRights = AccessRights.FullAccess)]
    public class WPFTradingPanel : Robot
    {
        protected override void OnStart()
        {
            var thread = new Thread(() =>
            {
                var window = new MainWindow(this);

                _ = window.ShowDialog();
            });

            thread.SetApartmentState(ApartmentState.STA);

            thread.Start();
        }
    }
}

Reconstruisez votre code en utilisant Visual Studio et créez une instance de votre cBot. Exécutez-le et la fenêtre suivante devrait apparaître.
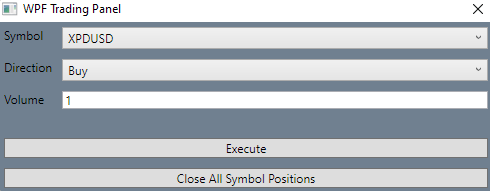
Image title

Dans la fenêtre, sélectionnez un symbole dans la liste des symboles et cliquez sur Exécuter. Bien que notre panneau de trading soit un peu simple, il fonctionne comme prévu. Vous pouvez l'utiliser comme modèle pour créer des contrôles WPF complexes.

Le code dans le fichier .xaml.cs de notre fenêtre est responsable de l'envoi d'instructions à notre cBot. Lors du développement du code backend pour vos fenêtres, suivez ces directives :

  • Créez un service pour gérer les interactions avec un cBot ou un indicateur en utilisant la méthode BeginInvokeOnMainThread().
  • Si vous construisez des contrôles WPF complexes, utilisez MVVM, IoC et séparez vos composants de logique métier de l'interface utilisateur (par exemple, en utilisant Prism)

Utiliser un thread dédié pour l'interface utilisateur

Les fenêtres WinForms et WPF doivent s'exécuter à l'intérieur d'un thread marqué STA, sinon elles ne fonctionneront pas. Pour plus d'informations, consultez la documentation officielle.

Vous ne pouvez pas modifier la propriété ApartmentState d'un thread déjà en cours d'exécution. Comme le thread principal du cBot ou de l'indicateur n'est pas marqué STA, vous devez utiliser un nouveau thread marqué STA pour WinForms et WPF.

Accéder aux membres de l'API depuis le thread de l'interface utilisateur

Comme nous l'avons expliqué précédemment, vous devez utiliser un thread dédié séparé pour exécuter vos contrôles WPF. Seul le code s'exécutant sur ce thread pourra accéder aux contrôles et propriétés de la fenêtre.

Il en va de même pour tous les membres de l'API algo. Comme l'API n'est pas thread-safe, vous ne pouvez pas accéder aux membres de l'API depuis le thread de l'interface utilisateur. Au lieu de cela, vous devez dispatcher le travail en utilisant la méthode BeginInvokeOnMainThread() dans le code de votre indicateur ou cBot.

Cela peut créer des complications si vous souhaitez échanger des données entre votre indicateur ou cBot et une fenêtre WPF. Pour résoudre ce problème, vous pouvez créer une classe proxy pour gérer les interactions entre votre cBot ou indicateur et les threads liés à l'interface utilisateur.