App and account authentication
The cTrader Open API authentication process is based on the OAuth 2.0 standard.
This framework allows third-party applications to attain limited access to a service either on behalf of the resource owner, by orchestrating an approval interaction between the resource owner and the service, or by allowing a third-party application to attain access on its own behalf.
Authentication flow
As per the OAuth 2.0 standard, account authentication requires both an authorisation code and an access token.
Define tokens
An authorisation code is a short-term token that is issued for an individual cTID. Its expiration period is one minute. An access token is a long-term token that allows an application to send and receive messages to and from the cTrader backend. After receiving it, an authorisation code must be quickly exchanged for an access token; afterwards, all messages sent to the cTrader backend have to be signed with the received access token to authenticate your application. The expiration period of an access token is 2,628,000 seconds (approximately 30 days). After it is expired, a new access token can be generated using a refresh token. The refresh token does not have an expiration period.
Typically, the process of someone new starting to use your application for the first time looks as follows:
1. A user with a certain cTID accesses your application wherever it is deployed; the user interacts with an action button or equivalent.
2. The application uses an embedded browser (or any other suitable means) to redirect the user to a specific URI where they will give the app the necessary permissions.
Gain trust
Before redirecting the user to this URI, make sure that the user trusts your app and is aware of the fact that they will need to provide additional permissions.
3. The user is transferred to a predefined redirect URL. This URL contains the access token as the value of the code query parameter.
4. The user is transferred back to the app either of their own accord or automatically. The app is informed of the value of the code parameter.
5. The app sends a request for exchanging the authorization code with an access token to a specific endpoint.
6. The app receives a response containing the access token as the value of the accessToken key.
7. The app sends the ProtoOAApplicationAuthReq message containing the clientId and clientSecret fields.
8. The app sends the ProtoOAGetAccountListByAccessTokenReq message containing the accessToken field. The response (ProtoOAGetAccountListByAccessTokenRes) contains the repeated ctidTraderAccountId field.
9. After receiving a response, the app sends the ProtoOAAccountAuthReq message containing the ctidTraderAccountId and accessToken fields.
Afterwards, the user should be authenticated under the account the ctidTraderAccountId of which matches the ctidTraderAccountId provided during step 8.
The diagram below explains how the basic authentication flow works from the perspective of your Open API application.
graph TB
  A([Redirect the user to a <br/> specific URI]) ==> B([Receive the authorisation <br/> code]);
  B ==> C([Send a request for attaining <br/> an access code]);
  C ==> D([Send the <br/> ProOAApplicationAuthReq <br/> message]);
  D ==> E([Send the <br/> ProtoOAAccountAuthReq <br/> message]);
In the sub-sections below, we explain the key steps of the authentication flow in detail.
Add a redirect URI
As shown previously, your app needs to attain an authorisation code after a user is sent to a certain redirect URI. This URI will include the authorisation code as the value of the code query parameter.
To add a new redirect URI, do the following:
1. Open the Applications page in the Open API portal.
2. Select the Edit button in the row with the application to which you would like to add a redirect URL.
3. In the newly appeared screen, scroll down to the Redirect URIs section.
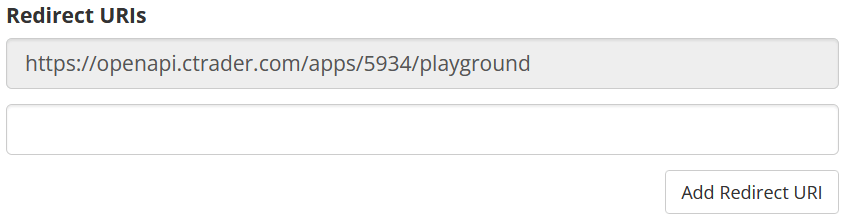
4. Add a redirect URL in an available empty text input field. If no available fields are shown, select the Add redirect URI button.
5. Select the Save button at the bottom of the page to apply your changes.
Manage redirect URIs
The very first redirect URI is for the Playground service that allows you to test your application before giving regular users access to it. It must never be used for a production application. You can add an unlimited number of redirect URIs if required.
Attain the authorisation code
To receive an authorisation code for a specific cTID, your app will need to send a user to the following URI.
https://id.ctrader.com/my/settings/openapi/grantingaccess/?client_id={clientId}&redirect_uri={your_redirectURI}&scope={scope}&product=web
Note
At this stage, the user will need to permit your application or service to access their trading accounts. As a result, it is imperative you provide the user with a full understanding of what using your application or service will require regarding permissions, data storage and data processing.
This URI has the following query parameters.
| Parameter | Required? | Definition |
|---|---|---|
client_id | Yes | The unique identifier of your Open API application. |
redirect_uri | Yes | A valid redirect URI specified in the settings of your application. |
scope | Yes | The scope of the permissions that you would like to be given to your application. The following values are accepted:accounts. View only access is given. Your application will be able to access account information and statistics; performing trading operations will be impossible.trading. Full access is given to account information and statistics as well as all permitted trading operations. |
product | No | If this parameter is specified and set to web, the authorisation screen lacks the header and footer, which makes it look better on mobile devices. While the parameter is optional, we recommend setting it to web. |
To view your client_id, go to the Applications page and select the View button in the Credentials column.
After a user is sent to the URI above (and as long as both parameters are valid), they should see a login/signup screen prompting them to authorise under their cTID. Following that, a user will be shown a dialog where they will be able to permit the application to gain access to one or more accounts linked to their cTID.
When the user selects the Allow access button, they will be redirected to the redirect_uri you had specified originally. As shown in the below example, the authorization code will be added to this URI as a query parameter.
https://my-redirect-uri.com/?code=123ASDASffdg_as234_GCllkoq14adRB7_tvN
At this point, your application would need to access and store the value of the code parameter. It must be quickly exchanged with an access token before the authorisation code expires.
Additional accounts
If a user creates additional accounts after completing the actions described above, these accounts will not be authorised inside the application. Instead, the user would need to be redirected back to the URL provided above so that they could give the application access to any additional accounts that they have created since last login.
Authentication via Google
If the above URI is opened via WebView and the user chooses Google to sign in, Google will display an Access blocked page, preventing the user from proceeding further.
To prevent this, make sure that the user-agent signature of the device opening the page looks as follows.
'user-agent': 'Mozilla/5.0 (Windows NT 10.0; Win64; x64) AppleWebKit/537.36 (KHTML, like Gecko) Chrome/120.0.0.0 Safari/537.36'
Attain an access token
To get an access token, perform the following REST API call.
Relative URL
The request URL is relative to https://openapi.ctrader.com.
| Method | URL |
|---|---|
GET | apps/token |
This request includes the following query parameters.
| Parameter | Required? | Definition |
|---|---|---|
grant_type | Yes | The type of the token sent to this endpoint. The following values are accepted.authorization_code. An authorisation code is sent to the endpoint to exchange it with an access token.refresh_token. A refresh token is sent to the endpoint to refresh an existing access token. |
code | No | The token sent to the endpoint. This parameter is mandatory if grant_type=authorization_code. |
redirect_uri | No | A valid redirect URI specified in the settings of your application. This parameter is mandatory if grant_type=authorization_code. |
client_id | Yes | The unique identifier of your Open API application. |
client_secret | Yes | The secret key assigned to your Open API application. |
The request example can be found below.
curl -X GET 'https://openapi.ctrader.com/apps/token?grant_type=authorization_code&code=0ssdgds98as9_QSF56FVC_22dfdf&redirect_uri=https://spotware.com&client_id=5430012&client_secret=012sds23dlkjQsd' -H 'Accept: application/json' -H 'Content-Type: application/json'
To view your client_secret, return to the Applications page and select the View button in the Credentials column.
Upon a successful request, you should receive a response with the following keys.
| Key | Value type | Definition |
|---|---|---|
"accessToken" | string | The access token that your application will use to authenticate the messages sent to cTrader Open API. |
"tokenType" | string | The type of the access token ("bearer" should be the value of this key as the REST standard is used to make the request). |
"expiresIn" | integer | The number of seconds that must pass before the access token expires (by default, the value of this key equals 2628000). |
"refreshToken" | string | The refresh token that must be used for renewing the access token once it expires. The refresh token has no expiry time itself. |
"errorCode" | string/null | The error code that describes why a request was unsuccessful. For a successful request, the value of this key should be null. |
"description" | string/null | The description of an error that has occured during an unsuccessful request. For a successful request, the value of this key should be null. |
For an example of a successful response, see the snippet below.
{
    "accessToken":"mos8Bw3D4EG0fRPd4Eqq0JxaFT4zjd8e4YijNezh_ag",
    "tokenType":"bearer",
    "expiresIn":2628000,
    "refreshToken":"VCuafFhy81AFZjsWkbuEzdOhhRj5YTWz8fWUwHam7KM",
    "errorCode":null,
    "description":null,
}
Send the required ProtoBuf messages
After receiving a valid access code, your application will need to send the ProtoOAApplicationAuthReq, ProtoOAGetAccountListByAccessTokenReq and ProtoOAAccountAuthReq messages. This can be done as follows.
1 2 3 4 5 6 7 8 9 10 11 12 13 14 15 16 17 18 19 20 21 22 23 24 25 26 27 28 29 30 31 32 33 34 35 36 37 38 39 40 | |
1 2 3 4 5 6 7 8 9 10 11 12 13 14 15 16 17 18 19 20 21 22 23 24 25 26 27 28 29 30 31 32 33 34 35 36 37 38 39 40 41 42 43 44 45 | |
Refresh the access token
After an access token expires, you will have to renew it using the refreshToken you received earlier. You can perform this action via two different methods.
Send an HTTP request
To attain a new access token (and, subsequently, a new refresh token), you can perform the same HTTP request covered above. As shown in the below example, you would have to set the grant_type query parameter to refresh_token.
curl -X POST 'https://openapi.ctrader.com/apps/token?grant_type=refresh_token&refresh_token=asdXCVCVAS_218kjashf_asdasd2ASD_223x&client_id=5430012&client_secret=012sds23dlkjQsd' -H 'Accept: application/json' -H 'Content-Type: application/json'
You will receive a response containing the new values of the accessToken and refreshToken keys. You can safely use these new values while the old values of the same keys are automatically invalidated.
Send a Protobuf message
Alternatively, you can send the ProtoOARefreshTokenReq and receive the ProtoOARefreshTokenRes message containing new valid tokens.
1 2 3 4 5 6 7 8 9 10 11 12 13 14 15 16 | |
1 | |
Use the Playground
The Playground provides a quick means for attaining an access token for your own cTID, allowing you to quickly and easily develop and test your app before distributing it among its target audience.
To access the Playground, go to the Applications page and select the Playground button. In the newly appeared window, select the scope of the application and click the Get token button.
Afterwards, you should see the following page.
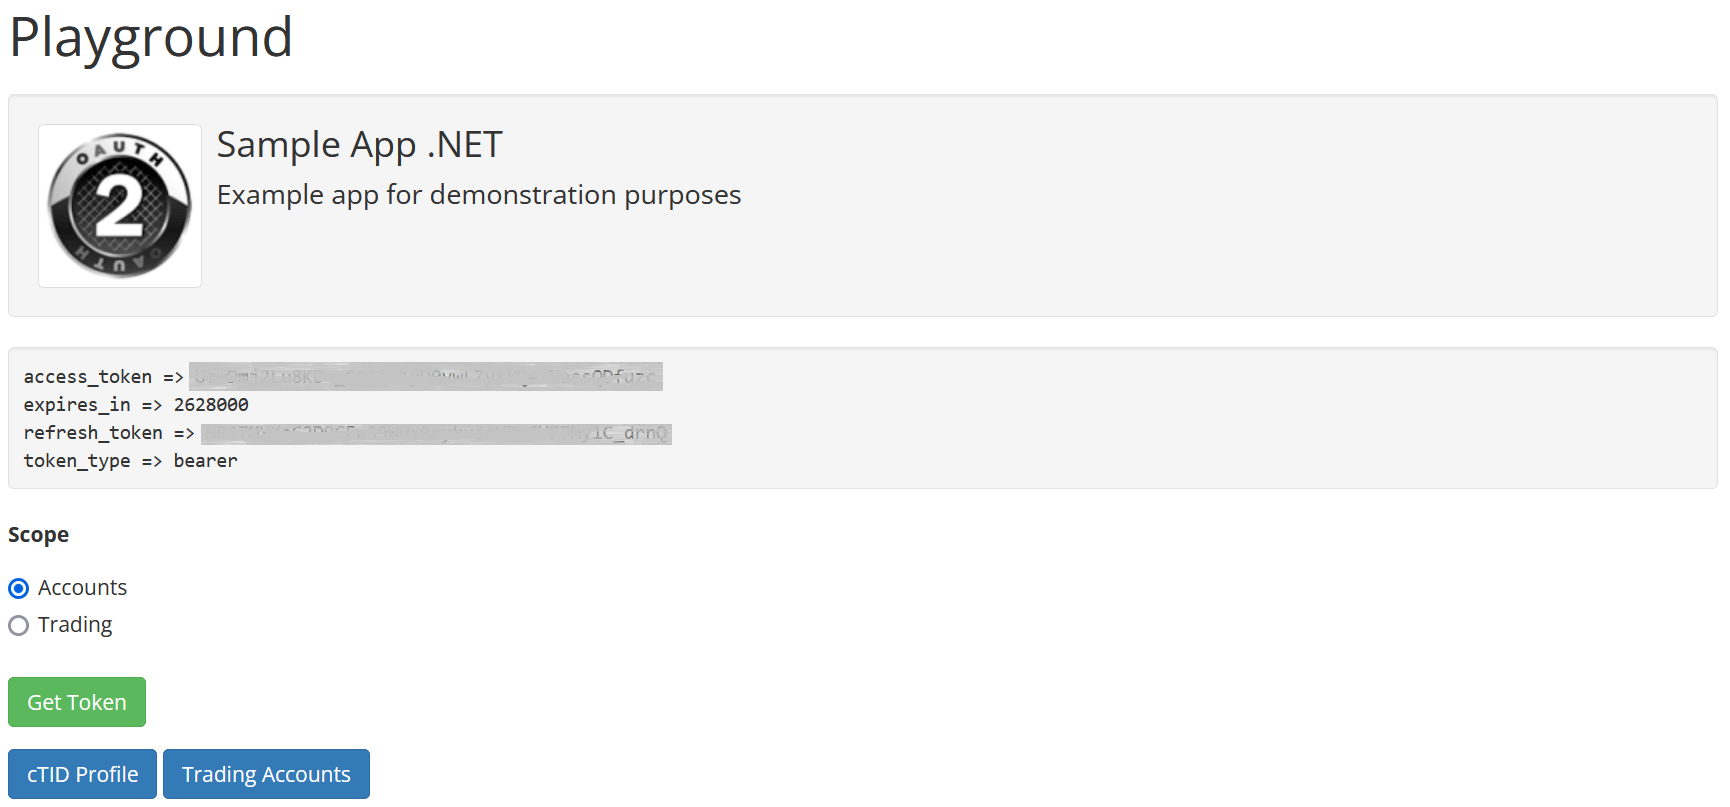
You can use the access token and the refresh token for sending messages to the API while authenticated under your own cTID.