활성 심벌 패널용 플러그인 만드는 방법 VIDEO
플러그인을 사용하면 활성 심벌 패널(ASP)
이 글과 관련 동영상에서는 플러그인을 사용하여 활성 심벌 패널에 새 섹션을 추가하는 방법을 보여드리겠습니다.
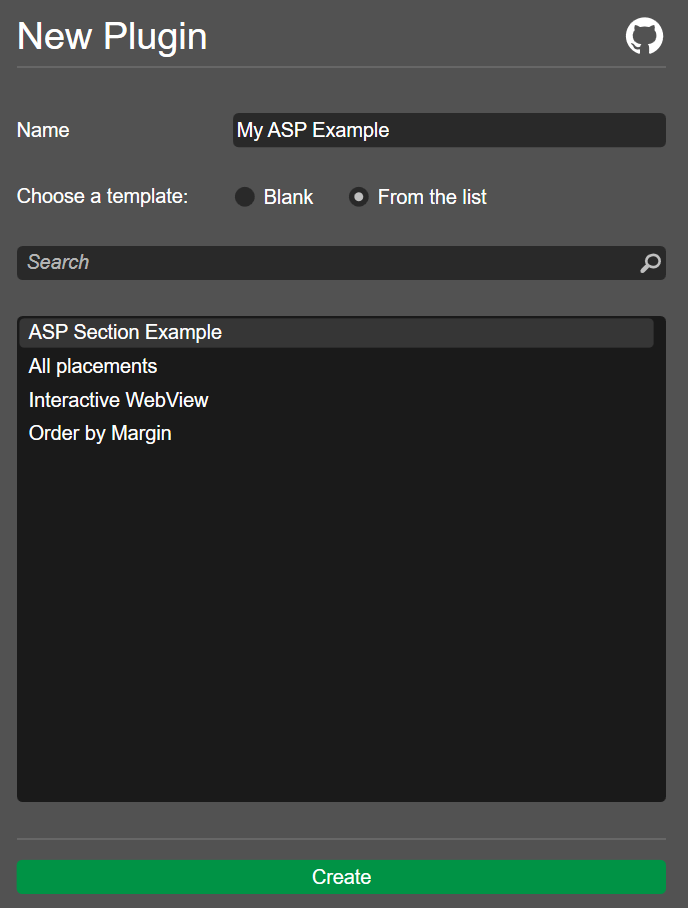
플러그인 만들기 WebView 섹션 만들기 Algo 앱으로 이동하여 플러그인 탭으로 이동합니다. 새로 만들기 버튼을 클릭하여 새 플러그인을 만듭니다. 목록에서 옵션을 선택하고 ASP Section Example 을 선택합니다. 플러그인 이름을 지정합니다(예: "My ASP Example").
만들기 버튼을 클릭합니다.
코드 편집기가 나타나면 코드의 "My title" 부분을 플러그인에 지정한 이름으로 바꿉니다.
var block = Asp . SymbolTab . AddBlock ( "My ASP Example" );
아래에서 전체 코드를 복사할 수 있습니다:
 1
 2
 3
 4
 5
 6
 7
 8
 9
10
11
12
13
14
15
16
17
18
19
20
21
using cAlgo.API ;
namespace cAlgo.Plugins
{
[Plugin(AccessRights = AccessRights.None)]
public class MyASPExample : Plugin
{
protected override void OnStart ()
{
var block = Asp . SymbolTab . AddBlock ( "My ASP Example" );
block . Index = 2 ;
block . Height = 500 ;
block . IsExpanded = true ;
var webView = new WebView ();
block . Child = webView ;
webView . NavigateAsync ( "https://ctrader.com/" );
}
}
}
빌드 버튼을 클릭하거나 Ctrl + B
Trade 앱으로 다시 이동하여 플러그인이 활성 심벌 패널 에 표시하는 내용을 확인합니다. 우리의 경우 cTrader 포럼을 표시하는 WebView 구성 요소가 있습니다.
VWAP 박스 만들기 이 예시에서는 WebView를 현재 오픈된 포지션의 거래량 가중평균가격(VWAP)을 표시하는 박스로 대체하겠습니다.
플러그인 코드로 돌아가서 WebView 섹션을 삭제합니다.
블록 높이를 100으로 설정합니다.
관련 정보를 표시할 두 개의 텍스트 블록을 정의합니다.
TextBlock _txtBuyVWAP ;
TextBlock _txtSellVWAP ;
텍스트 상자용 패널을 추가합니다.
var panel = new StackPanel
{
Orientation = Orientation . Vertical
};
두 개의 텍스트 블록을 초기화합니다.
_txtBuyVWAP = new TextBlock
{
Text = "Buy Text Box"
};
_txtSellVWAP = new TextBlock
{
Text = "Sell Text Box"
};
패널에 텍스트 상자를 추가하고 패널을 플러그인 블록의 하위 컨트롤로 만듭니다.
panel . AddChild ( _txtBuyVWAP );
panel . AddChild ( _txtSellVWAP );
block . Child = panel ;
아래에서 전체 코드를 복사할 수 있습니다:
1
2
3
4
5
6
7
8
9
10
11
12
13
14
15
16
17
18
19
20
21
22
23
24
25
26
27
28
29
30
31
32
33
34
35
36
37
38 using cAlgo.API ;
namespace cAlgo.Plugins
{
[Plugin(AccessRights = AccessRights.None)]
public class MyASPExample : Plugin
{
TextBlock _txtBuyVWAP ;
TextBlock _txtSellVWAP ;
protected override void OnStart ()
{
var block = Asp . SymbolTab . AddBlock ( "ASP Section Example" );
block . Index = 2 ;
block . Height = 100 ;
block . IsExpanded = true ;
var panel = new StackPanel
{
Orientation = Orientation . Vertical
};
_txtBuyVWAP = new TextBlock
{
Text = "Buy Text Box"
};
_txtSellVWAP = new TextBlock
{
Text = "Sell Text Box"
};
panel . AddChild ( _txtBuyVWAP );
panel . AddChild ( _txtSellVWAP );
block . Child = panel ;
}
}
}
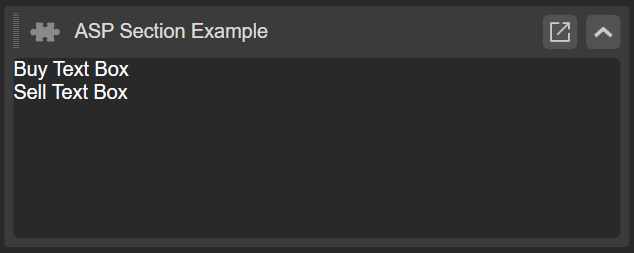
플러그인을 빌드한 다음 Trade 앱으로 이동합니다.
WebView 구성 요소 대신 두 개의 텍스트 상자가 표시되어야 합니다.
플러그인 개선 플러그인에 로직 추가하기 플러그인 코드로 이동하여 다음 네임스페이스를 추가합니다:
using System ;
using System.Linq ;
매수 및 매도 방향에 대한 VWAP를 계산하는 로직을 구현합니다.
var buyPositions = Positions . Where ( p => p . TradeType == TradeType . Buy );
_txtBuyVWAP . Text = "Buy Positions VWAF: " + Math . Round (( buyPositions . Sum ( p => p . EntryPrice * p . VolumeInUnits ) / buyPositions . Sum ( p => p . VolumeInUnits )), 5 );
var sellPositions = Positions . Where ( p => p . TradeType == TradeType . Sell );
_txtSellVWAP . Text = "Sell Positions VWAF: " + Math . Round (( sellPositions . Sum ( p => p . EntryPrice * p . VolumeInUnits ) / sellPositions . Sum ( p => p . VolumeInUnits )), 5 );
포지션 오픈을 처리하는 이벤트를 추가하여 새 포지션이 추가될 때 VWAP 수치가 자동으로 업데이트되도록 합니다.
Positions . Opened += Positions_Opened ;
private void Positions_Opened ( PositionOpenedEventArgs obj )
{
var buyPositions = Positions . Where ( p => p . TradeType == TradeType . Buy );
_txtBuyVWAP . Text = "Buy Positions VWAP: " + ( buyPositions . Sum ( p => p . EntryPrice * p . VolumeInUnits ) / buyPositions . Sum ( p => p . VolumeInUnits ));
var sellPositions = Positions . Where ( p => p . TradeType == TradeType . Sell );
_txtSellVWAP . Text = "Sell Positions VWAP: " + ( sellPositions . Sum ( p => p . EntryPrice * p . VolumeInUnits ) / sellPositions . Sum ( p => p . VolumeInUnits ));
}
아래에서 전체 코드를 복사할 수 있습니다:
1
2
3
4
5
6
7
8
9
10
11
12
13
14
15
16
17
18
19
20
21
22
23
24
25
26
27
28
29
30
31
32
33
34
35
36
37
38
39
40
41
42
43
44
45
46
47
48
49
50
51
52
53
54
55
56
57
58
59 using System ;
using System.Linq ;
using cAlgo.API ;
namespace cAlgo.Plugins
{
[Plugin(AccessRights = AccessRights.None)]
public class MyASPExample : Plugin
{
TextBlock _txtBuyVWAP ;
TextBlock _txtSellVWAP ;
protected override void OnStart ()
{
var block = Asp . SymbolTab . AddBlock ( "ASP Section Example" );
block . Index = 2 ;
block . Height = 100 ;
block . IsExpanded = true ;
var panel = new StackPanel
{
Orientation = Orientation . Vertical
};
_txtBuyVWAP = new TextBlock
{
Text = "Buy Text Box"
};
_txtSellVWAP = new TextBlock
{
Text = "Sell Text Box"
};
panel . AddChild ( _txtBuyVWAP );
panel . AddChild ( _txtSellVWAP );
block . Child = panel ;
var buyPositions = Positions . Where ( p => p . TradeType == TradeType . Buy );
_txtBuyVWAP . Text = "Buy Positions VWAF: " + Math . Round (( buyPositions . Sum ( p => p . EntryPrice * p . VolumeInUnits ) / buyPositions . Sum ( p => p . VolumeInUnits )), 5 );
var sellPositions = Positions . Where ( p => p . TradeType == TradeType . Sell );
_txtSellVWAP . Text = "Sell Positions VWAF: " + Math . Round (( sellPositions . Sum ( p => p . EntryPrice * p . VolumeInUnits ) / sellPositions . Sum ( p => p . VolumeInUnits )), 5 );
Positions . Opened += Positions_Opened ;
}
private void Positions_Opened ( PositionOpenedEventArgs obj )
{
var buyPositions = Positions . Where ( p => p . TradeType == TradeType . Buy );
_txtBuyVWAP . Text = "Buy Positions VWAP: " + ( buyPositions . Sum ( p => p . EntryPrice * p . VolumeInUnits ) / buyPositions . Sum ( p => p . VolumeInUnits ));
var sellPositions = Positions . Where ( p => p . TradeType == TradeType . Sell );
_txtSellVWAP . Text = "Sell Positions VWAP: " + ( sellPositions . Sum ( p => p . EntryPrice * p . VolumeInUnits ) / sellPositions . Sum ( p => p . VolumeInUnits ));
}
}
}
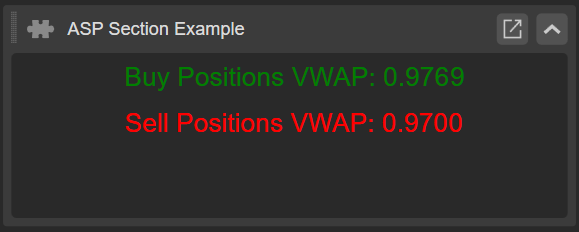
플러그인을 다시 빌드하고 Trade 앱으로 이동합니다. 이제 새로운 매수 및 매도 포지션을 추가하면 VWAP가 자동으로 업데이트되는 것을 볼 수 있습니다.
플러그인에 스타일 추가하기 VWAP 박스에 스타일을 추가할 수 있습니다.
1
2
3
4
5
6
7
8
9
10
11
12
13
14
15
16
17
18
19
20
21 var textBoxStyle = new Style ();
textBoxStyle . Set ( ControlProperty . Margin , 5 );
textBoxStyle . Set ( ControlProperty . FontFamily , "Cambria" );
textBoxStyle . Set ( ControlProperty . FontSize , 16 );
textBoxStyle . Set ( ControlProperty . Width , 200 );
textBoxStyle . Set ( ControlProperty . ForegroundColor , Color . Yellow , ControlState . Hover );
_txtBuyVWAP = new TextBlock
{
ForegroundColor = Color . Green ,
Text = "Buy Text Box " ,
Style = textBoxStyle
};
_txtSellVWAP = new TextBlock
{
ForegroundColor = Color . Red ,
Text = "Sell Text Box" ,
Style = textBoxStyle
};
아래에서 전체 코드를 복사할 수 있습니다:
1
2
3
4
5
6
7
8
9
10
11
12
13
14
15
16
17
18
19
20
21
22
23
24
25
26
27
28
29
30
31
32
33
34
35
36
37
38
39
40
41
42
43
44
45
46
47
48
49
50
51
52
53
54
55
56
57
58
59
60
61
62
63
64
65
66
67
68
69
70 using System ;
using System.Linq ;
using cAlgo.API ;
namespace cAlgo.Plugins
{
[Plugin(AccessRights = AccessRights.None)]
public class MyASPExample : Plugin
{
TextBlock _txtBuyVWAP ;
TextBlock _txtSellVWAP ;
protected override void OnStart ()
{
var block = Asp . SymbolTab . AddBlock ( "ASP Section Example" );
block . Index = 2 ;
block . Height = 100 ;
block . IsExpanded = true ;
var panel = new StackPanel
{
Orientation = Orientation . Vertical
};
var textBoxStyle = new Style ();
textBoxStyle . Set ( ControlProperty . Margin , 5 );
textBoxStyle . Set ( ControlProperty . FontFamily , "Cambria" );
textBoxStyle . Set ( ControlProperty . FontSize , 16 );
textBoxStyle . Set ( ControlProperty . Width , 200 );
textBoxStyle . Set ( ControlProperty . ForegroundColor , Color . Yellow , ControlState . Hover );
_txtBuyVWAP = new TextBlock
{
ForegroundColor = Color . Green ,
Text = "Buy Text Box " ,
Style = textBoxStyle
};
_txtSellVWAP = new TextBlock
{
ForegroundColor = Color . Red ,
Text = "Sell Text Box" ,
Style = textBoxStyle
};
panel . AddChild ( _txtBuyVWAP );
panel . AddChild ( _txtSellVWAP );
block . Child = panel ;
var buyPositions = Positions . Where ( p => p . TradeType == TradeType . Buy );
_txtBuyVWAP . Text = "Buy Positions VWAF: " + Math . Round (( buyPositions . Sum ( p => p . EntryPrice * p . VolumeInUnits ) / buyPositions . Sum ( p => p . VolumeInUnits )), 5 );
var sellPositions = Positions . Where ( p => p . TradeType == TradeType . Sell );
_txtSellVWAP . Text = "Sell Positions VWAF: " + Math . Round (( sellPositions . Sum ( p => p . EntryPrice * p . VolumeInUnits ) / sellPositions . Sum ( p => p . VolumeInUnits )), 5 );
Positions . Opened += Positions_Opened ;
}
private void Positions_Opened ( PositionOpenedEventArgs obj )
{
var buyPositions = Positions . Where ( p => p . TradeType == TradeType . Buy );
_txtBuyVWAP . Text = "Buy Positions VWAP: " + ( buyPositions . Sum ( p => p . EntryPrice * p . VolumeInUnits ) / buyPositions . Sum ( p => p . VolumeInUnits ));
var sellPositions = Positions . Where ( p => p . TradeType == TradeType . Sell );
_txtSellVWAP . Text = "Sell Positions VWAP: " + ( sellPositions . Sum ( p => p . EntryPrice * p . VolumeInUnits ) / sellPositions . Sum ( p => p . VolumeInUnits ));
}
}
}
플러그인을 다시 빌드합니다.
마지막으로 Trade 앱으로 이동하여 스타일이 VWAP 박스를 어떻게 변경했는지 확인합니다.
요약 이 글이 활성 심벌 패널에 웹페이지와 WebView 구성 요소, 텍스트 블록 및 기타 유용한 객체를 추가하는 방법을 보여주는 데 도움이 되었기를 바랍니다.